Showing posts with label Pin a Week. Show all posts

Friday, March 29, 2013

Delicious fruit dip! {Pin a week 13/52}

This isn't exactly a healthy snack, but it sure is delicious and easy! :) Original recipe here


It doesn't get much easier than this. Just mix one 8oz package of softened cream cheeese, one 7oz container marshmallow creme, a pinch of nutmeg, and 1/8 to 1/4 teaspoon of cinnamon together and dip your choice of fruit in it. Enjoy! 

Sunday, March 17, 2013

Crockpot pesto ranch chicken {Pin a week 12/52}

Whoever invented the crockpot was a genius. I need to use ours more. For this week's pin, I tried out this recipe for pesto ranch chicken. 

Click here for original recipe
It really doesn't get much more simple than this, and it turned out really good! I did change it up a bit though. Instead of thighs, I used breasts. I also added some potatoes and chopped onion, and next time I think I'll throw in some freshly minced garlic. 


P.S. Happy St. Patrick's Day from your favorite ginger couple! ;)


Dallin busted out his green suit coat for church today... because how often does St. Patty's Day fall on Sunday? ;)


We like each other.

Friday, March 15, 2013

Twist and flip updo {Pin a Week 11/52}

I really got lucky in the hair department. For some reason, the gods blessed me with straight, smooth, red hair that is extraordinarily low maintenance. Unfortunately, I am hair stupid. Rarely do I do anything with my hair besides leaving it down or pulling it into a ponytail or messy bun. And when I say "messy bun" I don't mean the cute kind... I mean the it-looks-like-I-recently-walked-through-a-car-wash messy bun. I've been trying to remedy this. It's not going to so well. So far the only thing I've mastered is the sock bun, but I'm usually too lazy even for this, especially when I'm teaching early-morning seminary and would much rather spend an extra 5 minutes in bed than do something with my hairs.

Anyway. Today I spent longer than I care to admit trying to replicate this hair-do. Looks easy, right? 


Well, I failed. Maybe my hair is too long, or maybe I just need a lot more practice, or maybe a little of both. Either way, here's what happened to me. :) 

(P.S. Excuse the bad pictures... I found that it is rather difficult to take pictures of the back of one's head. Plus, I was just using my iPhone instead of busting out my real camera.)


Take one... Nailed it! Hahaha! :)

When we're rich someday we're getting a new shower. It's happening.

Take two. A little better.


Take three. This is a good as it was going to get today. A little messier than I intended. 


Don't let the flower fool you... it is mostly to cover up some loops of hair I could not straighten out. :)

Bottom line: It ended up cute enough to go out in public, but I didn't like it enough to even leave it in. Also, it didn't feel very secure and since I'm not good at holding still that wouldn't work for me.

Well, there you have it. Anyone have any tips? I need help!

P.S Although this whole thing was kind of a failure, it did help me discover that I've got some blonde streaks at the nape of my neck, and I mean BLONDE. This picture doesn't do it justice. Who knew?? I wonder how long it has been that way... haha! 

Sunday, March 10, 2013

Cinnabon cinnamon rolls {Pin a week 10/52}

Please excuse the I've-been-living-in-a-hostel-for-a-week nastiness...
When I was in Russia we went on vacation to Moscow for a week. That is where I had the life changing experience of a fresh, warm, gooey, enormous, delectable Cinnabon cinnamon roll. It was perfection. It's really good thing I shared it with one of my friends. I don't even want to think about how unhealthy it was. 

It should be no surprise that when I found this Cinnabon clone recipe on Pinterest I knew I had to try it. The one that has been circulating is found here on allrecipes.com, but I also found the same recipe (but with better instructions, especially if you are using a Bosch or Kitchen Aid) here on the King Arthur Flour Company website.


Unfortunately, mine didn't turn out as good as I was expecting. I'm pretty sure it was my fault, but I'm still not positive what I did wrong. They didn't rise as much as they were supposed to so maybe they were too dry or something. I also baked them a minute or two too long, hoping that it would help them puff up some more but that didn't work. Oh well. I think I will try it again sometime though. And even if they didn't come out perfectly they were still really good! I mean, how can you go wrong with that much butter, sugar, and carbs, am I right? ;) 


Tuesday, March 5, 2013

DIY Bows {Pin a week 9/52}

I love bows. They add such a simple, girly touch. It's also really handy that they are so easy to make. I've been meaning to make some headbands for my little sister and finally got around to it this week.

Here is the tutorial I used for the bows. I need to practice because mine don't look this good yet! :) I think I am making them a little too wide. I've also seen some no-sew tutorials that I want to try where you just use a hot glue gun instead of sewing.


To make the headbands I just strung the elastic through the center of the bow and then stitched it in place. Check out this post to see where I got my elastic for cheap and what you can do with the leftovers!


I'm pretty sure my sister is going to look a lot cuter (thank goodness). ;)


Just in case you forgot how attractive I am.
I might hate myself someday for putting this one up... 

DIY elastic hair ties {Pin a week 8/52}

I have long, almost waist-length hair. It can be a major pain sometimes. Not enough to convince me to cut it off, but enough that something has to be done about it if I want to stay sane. This means that I put my hair in ponytails/buns a lot and go through more than a few hair ties. (Side note: Where the heck do hair ties and bobby pins go?? It's like magic... I buy a new pack and they slowly start disappearing to who knows where. Please tell me I'm not the only one with this problem!) I have seen these nifty elastic hair ties for sale around the internetz but they are CRAZY expensive. I'm not willing to pay $12 for a pack of 5 ($2.40 each!) especially since I know I will probably definitely lose them.

I thought they would be pretty easy to make, though, so I made a trip to Pinterestland and found a nifty tutorial. (Click here to see the one I used)


These are seriously the easiest things to make. Don't believe me? Here's the instructions.
  1. Cut elastic
  2. Tie a knot
  3. Melt the ends with a lighter or candle
  4. The end


Wanna know why I love these so much? Of course you do. ;) First of all, they are SO inexpensive. I bought my elastic here for $2.55 for 5 yards. Yep, you read that right. TWO FIFTY-FIVE FOR FIVE YARDS! That's 15 feet, or about 20 hair ties, which means they cost about about $0.12 a hair tie. Score! Second, they are really nice to my hair. They don't leave a crease or tear my hair when I take them out. And third, they look cute on my wrist. Pretty much a win-win-win. 


Saturday, February 16, 2013

Bacon roses {Pin a week 7/52}

Check out the awesome gift I gave my dear, meat-loving husband for Valentine's Day! 


We both got a kick out of it. :) Although I'm pretty sure I think it is funnier than anyone else does... haha!

This was so easy to make, even easier than I thought it would be! I saw a few tutorials on pinterest (this one is pretty good) but ended up kind of doing my own thing. This tutorial tells you to drill a hole in a muffin tin and use that to bake the bacon, but I just used an oven-safe cooling rack and it worked perfectly. 

If you want to make your own, here's what I did! 

1. Preheat oven to 375°. Cover a cookie sheet with foil (to make cleanup easier) and put an oven-safe cooling rack on top.

2. Roll up the bacon and place it on end on the cooling rack. Bake for about 30-40 minutes, depending on your oven. A couple of them started coming unrolled so I laid them on their sides for a few minutes.

3. While it bakes, get your stems ready. I used a 97¢ spray of roses from Walmart and it worked great! I pulled off the roses, removed the petals and the red plastic pieces, and then re-attached the green parts. Wedge a toothpick in the middle to keep the bacon secured.

4. When the bacon looks done, take it out of the oven and let it cool, and then put your bacon buds (catchy, right?) on the stems with the toothpick in the center.

Voila!


Nothing says "I love you" like bacon, right? :)

Hand warmers {Pin a week 6/52}


I saw a few different tutorials for this project, but this one was one of the better ones. 

Here's the ones I made! I gave them to my siblings for Valentine's Day. :)


(P.S. This was last week's project... I just didn't get around to blogging yet.)

Friday, February 1, 2013

Washi tape iPhone charger {Pin a Week 5/52}

This week's pin was super easy, and I think it turned out pretty cute... although I also think it probably makes me a crazy person. ;)

Original tutorial here.

Cute, eh? I like adding little pops of color in my life. :) 

P.S. I got the washi tape from this site. They have lots of cute choices and it shipped really quickly too! 

Wednesday, January 23, 2013

Creamy Tomato Pasta {Pin a Week 4/52}

This is definitely one of the best recipes I've found on Pinterest!

Click here to view the original recipe
I'm a sucker for pasta, all kinds. I love the tang of a good tomato sauce and the richness of a good cream sauce, and this blends the two together perfectly!

I pretty much followed the recipe this time, especially after last week's flop, but I did do a few things different. First of all, I added some sweet Italian sausage for some protein and flavor. I also used quite a bit more garlic... maybe even 3x as much. We really like garlic around here, okay? ;) It was just the right amount for our taste.

Last of all, I took a shortcut and just used bottled Alfredo sauce instead of making my own. I died a little inside doing that since I know how much better homemade cream sauce is, but I could't justify buying the ingredients since I know we'd probably never end up using the remainder. It called for 3/4 cup whole milk and 1/2 cup half and half, and I just couldn't justify buying a half gallon of milk and a carton of half and half that would most likely end up going to waste. Well, that and I didn't want to go to the store... heh heh. ;) Maybe that had more to do with it than anything, but whatever. It still tasted great with the bottled sauce, but one of these days I'm going to have to try using a homemade cream sauce.

Anyway, it was definitely a hit and I'm sure the leftovers won't last long! I'll be making this again for sure.


Sunday, January 20, 2013

Pan roasted chicken with garlic, potatoes, and green beans {Pin a week 3/52}

This week was a little crazy, so I'm posting this a little late... oh well. :)

Get recipe here

This recipe was pretty easy and probably would have turned out really well if I hadn't forgotten about the potatoes after I took the chicken out... they were a little overdone. ;) Also, I made the mistake of adding a little too much lemon juice. I also left out the green beans because the ones I had in my fridge were turning brown... dang it. Apparently they had been in there longer than I thought. 

The bottom line is that this is probably a really good recipe if you actually follow the recipe. ;) Let me know if you try it! 

Saturday, January 12, 2013

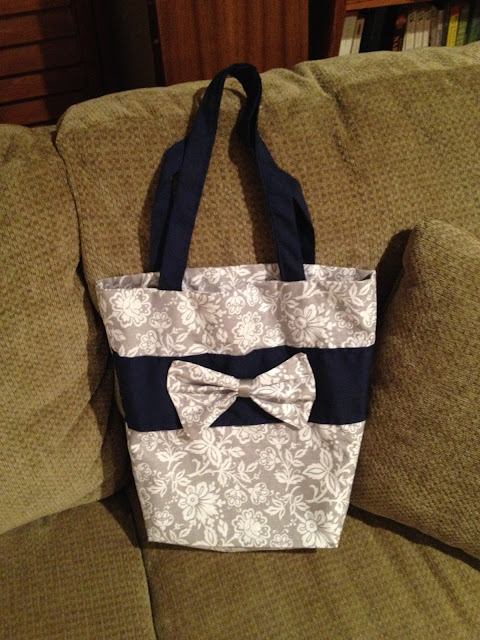
Bow Tote {Pin a Week 2/52}

I've been meaning to make some kind of tote for my seminary books for a while now. The bag I've been using just doesn't cut it, not when I'm hauling scriptures, a notebook, two thick manuals, a folder overflowing with papers (which desperately needs to be organized... oh well :P), pens, and anything else I need for the lesson that day. When I saw this tutorial on Pinterest, I knew I had to try it out.

Click here to view the tutorial
As you can see, I changed it up a bit to make it my own. 


Besides the obvious difference in my choice of fabric, I added another pocket inside (Because this world could use more pockets, especially in purses and skirts. Am I right?), and I also just sewed the bow right onto the anchor strap. On the original, the center of the bow wraps around both the bow and the anchor strap, but I liked the contrast of the gray against the blue and it kind of messed it up to do it that way. I also made the bow a little smaller and the bag bigger so my books would fit comfortably. 

Oh, and one tip if you are going to make this yourself... make sure you sew the straps on the right way. Trust me, I learned the hard way that involved a good amount of seam ripping and grumbling. Whoopsie. ;)

My seam ripper is both my best friend and my worst enemy... 
I think it turned out pretty cute though, if I do say so myself. ;)


Wednesday, January 2, 2013

8 Can Taco Soup {Pin a Week: 1/52}

Here is my first completed pin of this year!


Get recipe here.

This such a good, easy recipe. It really is as simple as dumping 8 cans of beans, chicken, corn, etc as well as some seasoning into a pot. That's my kind of recipe! :)

The recipe calls for a packet of taco seasoning, but I like it with a little more kick. I added some chili powder, crushed red pepper, cumin, and other spices to give it a little more flavor. Also, I like it pretty chunky so I didn't add a full can of broth. Next time I think I will leave it out completely. The best thing about this recipe is that it is really versatile and you can add whatever you want to make it your own. It's really good with cheese and tortilla chips, and cornbread would be really good too! I was just too lazy for that today. ;)

Another great thing about this recipe is that all of the ingredients have a long shelf life. Great for food storage, which I need to work on!  

Happy New Year!

Snuggled up on the couch watching the ball drop on Times Square. Can you tell I was really tired?
Also, I promise I am not 12...

Well, despite our fears of the Mayan apocalypse, we managed to survive 2012! And what a great year it was. :) I'm really looking forward to what this coming year will bring us. It's exciting to think about where we will be a year from now, and the year after that, and the year after that, and the year after that... you get the idea. Life is so good right now, and it just keeps getting better all the time, so I can only imagine how good it is going to get as the years go by! I am so blessed to be in a happy marriage with someone that really makes me happy and I know that is one of the main reasons why life is so good and why I am so looking forward to the future that is in store for us!

Besides giving me an excuse (like I need one) to be sappy about that husband of mine, New Years is such a great time to "take inventory" and make resolutions/set goals that will help me become a better version of myself. Most of them are going to remain in my personal journal. I figure the whole world doesn't need to know my weaknesses and faults. ;) Here are a couple of the less embarrassing ones though... and they happen to be my favorites too!


  1. Get my house organized and decorated. This includes a lot of projects. For example:
      • Paint, paint, paint. Our living room is good (Bless you Dallin for taking care of that when you bought this house!), but everywhere else is a cold, dingy white. I'm not a fan. It's intimidating but I'm going to hike up my britches, roll up my sleeves, and get started on this soon. We just have to pick colors... which is probably the biggest reason why I have not started yet. We're both rather indecisive people. ;)
      • Clean out our garage. Yippee! 
      • Get our canyoneering/hiking/camping/hunting paraphernalia organized. If you know Dallin and I, you know that we have quite a bit of this. :) Our upstairs bedroom is now appropriately referred to as the "canyoneering room" since that is where we are keeping all that junk now. One we clean out the garage, it will all get moved down there. Can't wait. 
  2. I love Pinterest. There are so many great ideas just waiting to be discovered. My problem is that I spend a lot more time discovering these great ideas than I spend actually using them. My second resolution is to do a pin a week, whether is is a recipe, sewing or craft project, or whatever I feel like doing. I'm also going to post about it on my blog since I know that will help me keep doing it, plus, it will be nice to keep a record of the pins I've completed. :)
Well, that's a wrap for now... Happy New Year! 2013 is going to be great, I can feel it! :)